Qwen2.5VL目标检测微调交通事故数据集
工具准备
模型下载
- 从modelscope中下载通义千问2.5-VL-32B-Instruct:https://www.modelscope.cn/models/Qwen/Qwen2.5-VL-32B-Instruct/files
硬件环境准备
- AutoDL中租用一张H20服务器 ,97871MiB 显存(足够训练32B的Lora低秩矩阵)
YOLO数据集转Qwen2.5VL数据集
yolo数据集目录
1/root/autodl-tmp/git/LLaMA-Factory/data/traffic_accident/dataset_no_negative/ 2├── train/ 3│ ├── images/ 4│ │ ├── 00.1_frame_000270.jpg 5│ │ ├── 00.1_frame_000300.jpg 6│ │ ├── 00.1_frame_000420.jpg 7│ │ └── ... (更多图片文件) 8│ └── labels/ 9│ ├── 00.1_frame_000270.txt 10│ ├── 00.1_frame_000300.txt 11│ ├── 00.1_frame_000420.txt 12│ └── ... (更多标签文件) 13└── valid/ 14 ├── images/ 15 │ ├── 00.1_frame_000240.jpg 16 │ ├── 00.1_frame_000330.jpg 17 │ ├── 00.1_frame_000360.jpg 18 │ └── ... (更多图片文件) 19 └── labels/ 20 ├── 00.1_frame_000240.txt 21 ├── 00.1_frame_000330.txt 22 ├── 00.1_frame_000360.txt 23 └── ... (更多标签文件)
取其中一个labels发现是yolo obb格式,这个格式用于目标检测任务,特别是 YOLO 格式的变体,用于描述图像中的目标。
10 0.565802 0.424693 0.620383 0.444703 0.595136 0.662345 0.540556 0.642335
- 第一个数字 0:这代表目标的类别索引 (class index)。数据集中会有一个配置文件(通常是 data.yaml 或类似的)来定义类别索引和类别名称的对应关系。例如,0 可能代表 "汽车",1 代表 "行人" 等,但在这里,0代表的是“交通事故”这一类别。
- 后面的8个数字:这看起来像是一个旋转边界框 (rotated bounding box) 或者是一个多边形 (polygon) 的坐标。标准的YOLO格式是4个数字,代表矩形框。这里的8个数字很可能是代表一个四边形的四个点的坐标,每个点有两个坐标 (x, y)。
- 0.565802 0.424693: 第一个点的 (x, y) 坐标。
- 0.620383 0.444703: 第二个点的 (x, y) 坐标。
- 0.595136 0.662345: 第三个点的 (x, y) 坐标。
- 0.540556 0.642335: 第四个点的 (x, y) 坐标。
将标签与图片结合后,得到结果如下:
yolo转Qwen2.5 VL 格式
为了让多模态大模型理解图像语义中目标识别的任务,我们需要将他转换成bounding box的形式,运行如下代码。
1import json 2import os 3from PIL import Image, ImageDraw 4import random 5from tqdm import tqdm 6from qwen_vl_utils import smart_resize 7 8factor = 28 9min_pixels = 3136 # Align with official preprocessor_config.json (56*56=3136) 10max_pixels = 2500000 11 12def run_yolo_to_qwen2_vl(yolo_dataset_root, output_file, visual_file_name = None, is_save_new_img = False, new_image_root=None): 13 """ 14 param: 15 yolo_dataset_root: YOLO数据集根目录 16 output_file: 输出多模态数据集文件路径 17 visual_file_name: 给定文件名,可视化出resize前后的bbox位置 18 """ 19 # 读取YOLO数据集,将其转化为qwen2.5-vl数据集 20 dataset = [] 21 image_paths_map = {} # 用于快速查找图片路径 22 for split in ["train", "valid"]: 23 image_dir = os.path.join(yolo_dataset_root, split, "images") 24 label_dir = os.path.join(yolo_dataset_root, split, "labels") 25 26 if not os.path.exists(image_dir): 27 continue 28 29 for image_filename in tqdm(os.listdir(image_dir), desc=f"Processing {split} set"): 30 if not image_filename.lower().endswith(('.png', '.jpg', '.jpeg')): 31 continue 32 33 image_path = os.path.join(image_dir, image_filename) 34 image_paths_map[image_filename] = image_path 35 label_filename = os.path.splitext(image_filename)[0] + ".txt" 36 label_path = os.path.join(label_dir, label_filename) 37 38 if not os.path.exists(label_path): 39 continue 40 origin_height, origin_width = 0, 0 # 原始图像高度和宽度 41 with Image.open(image_path) as img: 42 width, height = img.size 43 origin_height, origin_width = height, width 44 45 # 计算新的图像坐标,保存resize后的图像 46 height, width = smart_resize(origin_height,origin_width,factor,min_pixels,max_pixels) 47 48 if is_save_new_img and new_image_root: 49 new_img_dir = os.path.join(new_image_root, split, "images") 50 os.makedirs(new_img_dir, exist_ok=True) 51 new_img_path = os.path.join(new_img_dir, image_filename) 52 53 resized_img = img.resize((width, height), Image.Resampling.LANCZOS) 54 # 处理RGBA图像,转换为RGB模式再保存 55 if resized_img.mode == 'RGBA': 56 resized_img = resized_img.convert('RGB') 57 resized_img.save(new_img_path) 58 image_path = new_img_path # 更新image_path以指向新保存的图片 59 60 61 # 添加smart resize 62 # height, width = smart_resize(height, width, factor=factor, min_pixels=min_pixels, max_pixels=max_pixels) 63 # 计算缩放比例 64 scale_x = width / origin_width 65 scale_y = height / origin_height 66 bounding_boxes = [] 67 with open(label_path, 'r') as f: 68 for line in f: 69 parts = line.strip().split() 70 class_id = int(parts[0]) 71 72 # Handle OBB format (x1, y1, x2, y2, x3, y3, x4, y4) 73 if len(parts) == 9: 74 points = [float(p) for p in parts[1:]] 75 x_coords = [points[i] for i in range(0, 8, 2)] 76 y_coords = [points[i] for i in range(1, 8, 2)] 77 78 x_min_norm = min(x_coords) 79 y_min_norm = min(y_coords) 80 x_max_norm = max(x_coords) 81 y_max_norm = max(y_coords) 82 83 x_min = x_min_norm * origin_width 84 y_min = y_min_norm * origin_height 85 x_max = x_max_norm * origin_width 86 y_max = y_max_norm * origin_height 87 88 # Handle standard BBox format (x_center, y_center, w, h) 89 elif len(parts) == 5: 90 x_center, y_center, w, h = map(float, parts[1:]) 91 x_min = (x_center - w / 2) * origin_width 92 y_min = (y_center - h / 2) * origin_height 93 x_max = (x_center + w / 2) * origin_width 94 y_max = (y_center + h / 2) * origin_height 95 else: 96 print(f"Skipping malformed label line in {label_path}: {line.strip()}") 97 continue 98 99 # 缩放bbox 100 x_min = int(x_min * scale_x) 101 y_min = int(y_min * scale_y) 102 x_max = int(x_max * scale_x) 103 y_max = int(y_max * scale_y) 104 105 106 107 bounding_boxes.append({ 108 "bbox_2d": [int(x_min), int(y_min), int(x_max), int(y_max)], 109 "label": "accident", # Assuming 'accident' is the only class 110 "description": "检测到一个交通事故区域" 111 }) 112 113 if not bounding_boxes: 114 continue 115 116 box_list = [] 117 for bbox in bounding_boxes: 118 box_list.append(bbox["bbox_2d"]) 119 120 data_entry = { 121 "messages": [ 122 { 123 "role": "user", 124 "content": "<image>检测图像中的交通事故。请以JSON格式返回结果。" 125 }, 126 { 127 "role": "assistant", 128 # "content": json.dumps(bounding_boxes, ensure_ascii=False) 129 "content": f"<ref-object><bbox>检测到一个交通事故区域" 130 } 131 ], 132 "images": [ 133 os.path.abspath(image_path) 134 ], 135 "objects": { 136 "ref": ["交通事故"], 137 "bbox": box_list 138 } 139 } 140 dataset.append(data_entry) 141 142 if visual_file_name: 143 save_sample(dataset, output_dir="/root/autodl-tmp/git/LLaMA-Factory/tmp", visual_file_name=visual_file_name, image_paths_map=image_paths_map) 144 145 with open(output_file, 'w', encoding='utf-8') as f: 146 json.dump(dataset, f, indent=2, ensure_ascii=False) 147 148 print(f"Dataset successfully converted and saved to {output_file}") 149 150 # 保存部分图片和bbox,抽样20张,保存到 /root/autodl-tmp/git/LLaMA-Factory/tmp 151 if not visual_file_name: 152 save_sample(dataset, output_dir="/root/autodl-tmp/git/LLaMA-Factory/tmp") 153 154def save_sample(dataset, output_dir, visual_file_name=None, image_paths_map=None): 155 """ 156 保存部分图片和bbox,抽样10张,将bbox渲染上图,保存到 /root/autodl-tmp/git/LLaMA-Factory/tmp 157 如果提供了visual_file_name,则只处理该文件,并可视化resize前后的bbox位置。 158 """ 159 if not os.path.exists(output_dir): 160 os.makedirs(output_dir) 161 162 if visual_file_name: 163 # --- 可视化单个指定文件 --- 164 data_entry = None 165 for entry in dataset: 166 if os.path.basename(entry["images"][0]) == visual_file_name: 167 data_entry = entry 168 break 169 170 if not data_entry: 171 print(f"File '{visual_file_name}' not found in dataset.") 172 return 173 174 image_path = data_entry["images"][0] 175 label_path = os.path.splitext(image_path.replace("images", "labels"))[0] + ".txt" 176 177 if not os.path.exists(label_path): 178 print(f"Label file not found for {image_path}") 179 return 180 181 # 1. 可视化 'before' 182 with Image.open(image_path).convert("RGB") as img_orig: 183 origin_width, origin_height = img_orig.size 184 img_before = img_orig.copy() 185 draw_before = ImageDraw.Draw(img_before) 186 187 with open(label_path, 'r') as f: 188 for line in f: 189 parts = line.strip().split() 190 if len(parts) not in [5, 9]: continue 191 192 if len(parts) == 9: # OBB 193 points = [float(p) for p in parts[1:]] 194 x_coords = [points[i] * origin_width for i in range(0, 8, 2)] 195 y_coords = [points[i] * origin_height for i in range(1, 8, 2)] 196 x_min, y_min, x_max, y_max = min(x_coords), min(y_coords), max(x_coords), max(y_coords) 197 else: # BBOX 198 x_center, y_center, w, h = map(float, parts[1:]) 199 x_min = (x_center - w / 2) * origin_width 200 y_min = (y_center - h / 2) * origin_height 201 x_max = (x_center + w / 2) * origin_width 202 y_max = (y_center + h / 2) * origin_height 203 204 draw_before.rectangle([x_min, y_min, x_max, y_max], outline="blue", width=3) 205 206 before_filename = f"{os.path.splitext(visual_file_name)[0]}_before.jpg" 207 img_before.save(os.path.join(output_dir, before_filename)) 208 print(f"Saved 'before' visualization to {os.path.join(output_dir, before_filename)}") 209 210 # 2. 可视化 'after' 211 resized_height, resized_width = smart_resize(origin_height, origin_width, factor=factor, min_pixels=min_pixels, max_pixels=max_pixels) 212 img_after = img_orig.resize((resized_width, resized_height), Image.Resampling.LANCZOS) 213 draw_after = ImageDraw.Draw(img_after) 214 215 bounding_boxes = json.loads(data_entry["messages"][1]["content"]) 216 for bbox_info in bounding_boxes: 217 bbox = bbox_info["bbox_2d"] 218 draw_after.rectangle(bbox, outline="red", width=2) 219 220 after_filename = f"{os.path.splitext(visual_file_name)[0]}_after.jpg" 221 img_after.save(os.path.join(output_dir, after_filename)) 222 print(f"Saved 'after' visualization to {os.path.join(output_dir, after_filename)}") 223 224 return # 完成单个文件可视化后退出 225 226 # --- 如果 visual_file_name 为 None,则随机抽样10张图片进行可视化 --- 227 num_samples = 10 228 if len(dataset) > num_samples: 229 sampled_entries = random.sample(dataset, num_samples) 230 else: 231 sampled_entries = dataset 232 233 print(f"Randomly sampling {len(sampled_entries)} images to visualize...") 234 235 for i, data_entry in enumerate(tqdm(sampled_entries, desc="Saving samples")): 236 image_path = data_entry["images"][0] 237 base_filename = os.path.basename(image_path) 238 label_path = os.path.splitext(image_path.replace("images", "labels"))[0] + ".txt" 239 240 if not os.path.exists(label_path): 241 print(f"Label file not found for {image_path}, skipping.") 242 continue 243 244 try: 245 with Image.open(image_path).convert("RGB") as img_orig: 246 origin_width, origin_height = img_orig.size 247 248 # 1. 可视化 'before' 249 img_before = img_orig.copy() 250 draw_before = ImageDraw.Draw(img_before) 251 with open(label_path, 'r') as f: 252 for line in f: 253 parts = line.strip().split() 254 if len(parts) not in [5, 9]: continue 255 256 if len(parts) == 9: # OBB 257 points = [float(p) for p in parts[1:]] 258 x_coords = [points[i] * origin_width for i in range(0, 8, 2)] 259 y_coords = [points[i] * origin_height for i in range(1, 8, 2)] 260 x_min, y_min, x_max, y_max = min(x_coords), min(y_coords), max(x_coords), max(y_coords) 261 else: # BBOX 262 x_center, y_center, w, h = map(float, parts[1:]) 263 x_min = (x_center - w / 2) * origin_width 264 y_min = (y_center - h / 2) * origin_height 265 x_max = (x_center + w / 2) * origin_width 266 y_max = (y_center + h / 2) * origin_height 267 268 draw_before.rectangle([x_min, y_min, x_max, y_max], outline="blue", width=3) 269 270 before_filename = f"sample_{i}_{os.path.splitext(base_filename)[0]}_before.jpg" 271 img_before.save(os.path.join(output_dir, before_filename)) 272 273 # 2. 可视化 'after' 274 resized_height, resized_width = smart_resize(origin_height, origin_width, factor=factor, min_pixels=min_pixels, max_pixels=max_pixels) 275 img_after = img_orig.resize((resized_width, resized_height), Image.Resampling.LANCZOS) 276 draw_after = ImageDraw.Draw(img_after) 277 278 bounding_boxes = json.loads(data_entry["messages"][1]["content"]) 279 for bbox_info in bounding_boxes: 280 bbox = bbox_info["bbox_2d"] 281 draw_after.rectangle(bbox, outline="red", width=2) 282 283 after_filename = f"sample_{i}_{os.path.splitext(base_filename)[0]}_after.jpg" 284 img_after.save(os.path.join(output_dir, after_filename)) 285 286 except Exception as e: 287 print(f"Error processing {image_path}: {e}") 288 289if __name__ == "__main__": 290 dataset_root = "/root/autodl-tmp/git/LLaMA-Factory/data/traffic_accident/dataset_no_negative" 291 output_file = "/root/autodl-tmp/git/LLaMA-Factory/data/traffic_accident_align.json" 292 # new_image_root = "/root/autodl-tmp/git/LLaMA-Factory/data/traffic_accident/traffic_smart_resize_ms_swift" 293 294 # 使用方法:取消下面的注释并填入你想可视化的文件名 295 # is_save_new_img=True: 是否把resize后的图片保存到new_image_root 296 run_yolo_to_qwen2_vl(dataset_root, output_file) 297 # run_yolo_to_qwen2_vl(dataset_root, output_file, is_save_new_img=True, new_image_root=new_image_root) 298 # run_yolo_to_qwen2_vl(dataset_root, output_file, visual_file_name="zs2025-09-10_00-02-42-239.jpg")
- dataset_root:yolo 数据集路径
- output_file:Qwen2.5 数据集保存路径
值得注意的是代码中有三个参数:factor、min_pixels、max_pixels。这三个参数是qwen_vl_utils库中为 smart_resize 函数配置的,该函数用于预处理图像,使其符合 Qwen-VL 模型的输入要求,这个参数很重要,后续所有用到smart_resize的地方这三个参数都统一。
- factor = 28
确保最终调整后的图像尺寸(宽度和高度)都是 28 的倍数。
这是视觉模型(特别是基于 Vision Transformer, ViT 架构的模型)的一个常见要求。模型在内部会将图像分割成固定大小的“块”或“补丁”(Patches)进行处理。为了让图像能被完美地、没有剩余地分割成这些块,其尺寸必须是块大小的整数倍。这里的 28 很可能就与 Qwen-VL 模型视觉部分的 patch size 相关。smart_resize 会找到最接近原图长宽比且满足此条件的尺寸。
- min_pixels = 3136
设置图像被处理的最小像素总数。
如注释所示,3136 像素等于 56x56 的分辨率。这规定了输入模型的图像不能太小。如果一张图像的原始分辨率低于这个阈值,smart_resize 会将其放大,以确保模型有足够的信息来进行分析和理解。
- max_pixels = 12845056(但我训练用的是2500000足够了)
设置图像被处理的最大像素总数。
- 这是一个出于性能和显存(VRAM)占用的考虑。非常高分辨率的图像会消耗大量的计算资源和显存,可能导致训练或推理过程变得非常缓慢,甚至引发内存溢出(Out of Memory)错误。通过设置这个上限,smart_resize 会将过大的图像缩小,以保证计算的可行性和效率。可以让AI先看看你的数据集中图像像素情况,保证max_pixels的设置在合理的显存占用范围内即可,这并非一个固定值,但数据集的bbox部分在数据准备阶段和训练阶段都要统一。
- max_pixels 最好覆盖数据集中最大图像的像素值,否则会导致模型训练中会丢弃部分图像块,损失信息。
如何设置这三个参数值呢,模型下载目录下有个模型描述文件“preprocessor_config.json”,打开他,发现模型中最大最小能支持的图像像素值:
1{ 2 "min_pixels": 3136, // ✅ 3 "max_pixels": 12845056, // ✅ 4 "patch_size": 14, 5 "temporal_patch_size": 2, 6 "merge_size": 2, 7 "image_mean": [ 8 0.48145466, 9 0.4578275, 10 0.40821073 11 ], 12 "image_std": [ 13 0.26862954, 14 0.26130258, 15 0.27577711 16 ], 17 "image_processor_type": "Qwen2VLImageProcessor", 18 "processor_class": "Qwen2_5_VLProcessor" 19}
发现有min_pixels、max_pixels的最大最小能支持的像素值。factor固定填28。
执行完yolo转Qwen2.5VL的代码后,就能得到类似下面类GPT对话格式的训练文件,ms-swift(modelscope版的swift)对Grounding(定位)任务数据格式的要求如下所示,即使我们用LLama-Factory我们也可以先遵循这种格式看看能不能训练出来。
1[ 2 { 3 "messages": [ 4 { 5 "role": "user", 6 "content": "<image>检测图像中的交通事故。请以JSON格式返回结果。" 7 }, 8 { 9 "role": "assistant", 10 "content": "{\"bbox_2d\": [[337, 434, 937, 816]], \"label\": [\"交通事故\"], \"description\": \"(关于该图片详细的交通事故描述)。\"}" 11 } 12 ], 13 "images": [ 14 "/root/autodl-tmp/git/LLaMA-Factory/data/traffic_accident/dataset_no_negative/train/images/1955192471168225280.png" 15 ], 16 "objects": { 17 "ref": [ 18 "交通事故" 19 ], 20 "bbox": [ 21 [ 22 337, 23 434, 24 937, 25 816 26 ] 27 ] 28 } 29 }, 30 { 31 "messages": [ 32 { 33 "role": "user", 34 "content": "<image>检测图像中的交通事故。请以JSON格式返回结果。" 35 }, 36 { 37 "role": "assistant", 38 "content": "{\"bbox_2d\": [[337, 434, 937, 816]], \"label\": [\"交通事故\"], \"description\": \"(关于该图片详细的交通事故描述)。\"}" 39 } 40 ], 41 "images": [ 42 "/root/autodl-tmp/git/LLaMA-Factory/data/traffic_accident/dataset_no_negative/train/images/00.1_frame_000270.jpg" 43 ], 44 "objects": { 45 "ref": [ 46 "交通事故" 47 ], 48 "bbox": [ 49 [ 50 1044, 51 463, 52 1198, 53 723 54 ] 55 ] 56 } 57 } 58]
- objects: 这部分提供了模型需要学习的最终目标,也就是图像的标注信息。
- ref: 引用(Reference):在这里是 ["交通事故"]。这个文本会用来替换助手回答模板中的 <ref-object>。
- bbox: 边界框(Bounding Box)的坐标。例如 [[337, 434, 937, 816]]。
- 这四个数字通常代表 [x_min, y_min, x_max, y_max],即边界框左上角和右下角的像素坐标。
- 这个坐标数组会用来替换助手回答模板中的 <bbox>。
- 注意这个bbox的像素坐标位置对应于smart_resize后图像的位置,而不是原图像素位置。
- Assistant content:期待模型回答JSON格式,注意content中description字段(关于该图片详细的交通事故描述))由接下来的步骤补充。
给交通事故数据集新增图片理解描述
为了让多模态大模型更好的理解图像中出现交通事故,给出更细致的描述,上一个步骤中需要准备一些有关事故图片的详细描述,可以主要概括下面5个关注点。
- 事故发生的类型(轻微剐蹭?追尾?翻车?)和严重程度。
- 交警力量是否就位?
- 事故发生后占用在行驶方向的哪些车道?
- 推测人员是否发生伤亡?
- 事故后方是否放置警示物品(三脚架、警示锥)等?
为了快速获得大量的详细信息,这里用豆包多模态大模型对图片进行理解(可能存在误差),获得蒸馏后的数据。
最终训练数据的格式:
1[ 2 { 3 "messages": [ 4 { 5 "role": "user", 6 "content": "<image>检测图像中的交通事故。请以JSON格式返回结果。" 7 }, 8 { 9 "role": "assistant", 10 "content": "{\"bbox_2d\": [[337, 434, 937, 816]], \"label\": [\"交通事故\"], \"description\": \"### 交通事故情况分析如下:\\n\\n\\n#### 1. **车道占用情况** \\n道路为单向多车道(可见至少4条车道,以车辆行驶方向从左至右计数),事故车辆停放在**最右侧车道(第4条车道)**,未占用其他车道,整体占用**1条车道**。\\n\\n\\n#### 2. **交通事故类型** \\n两辆事故车辆(银色轿车与黑色SUV)并排停放在靠近路边的位置,车头朝向基本一致(均朝道路前方),车身无明显侧翻、严重变形或碰撞痕迹,推测为**轻微刮蹭事故**(可能为车辆变道或靠边时的侧面接触)。\\n\\n\\n#### 3. **人员情况** \\n现场共有3名人员,均站立于**道路边缘(靠近人行道的绿化带旁)**,未在车道中间停留,处于相对安全区域,未承受直接交通风险。\\n\\n\\n#### 4. **警示标志放置情况** \\n图像中未观察到车辆后方(或周围)有三脚架、警示牌等常规警示标志,也未发现石块、树枝等替代警示物,推测**未放置警示标志**。\\n\\n\\n#### 5. **交警抵达情况** \\n现场有1名人员穿着**荧光绿色反光背心、白色帽子**,手持疑似记录设备,符合交警或交通协管员的着装特征,判断**交警已抵达现场**并正在处理事故。\\n\\n\\n### 总结 \\n该事故为轻微刮蹭,占用单向最右侧1条车道,人员已撤离至安全区域,未放置警示标志,交警已到场处理。\"}" 11 } 12 ], 13 "images": [ 14 "/root/autodl-tmp/git/LLaMA-Factory/data/traffic_accident/dataset_no_negative/train/images/1955192471168225280.png" 15 ], 16 "objects": { 17 "ref": [ 18 "交通事故" 19 ], 20 "bbox": [ 21 [ 22 337, 23 434, 24 937, 25 816 26 ] 27 ] 28 } 29 }, 30 { 31 "messages": [ 32 { 33 "role": "user", 34 "content": "<image>检测图像中的交通事故。请以JSON格式返回结果。" 35 }, 36 { 37 "role": "assistant", 38 "content": "{\"bbox_2d\": [[1044, 463, 1198, 723]], \"label\": [\"交通事故\"], \"description\": \"根据图像分析,交通事故情况如下:\\n\\n\\n### 1. **事故车道占用情况** \\n图像显示为单向多车道道路(右侧为同一行驶方向,车辆均朝向上方行驶),从右往左数车道(第1车道为最右侧车道,靠近绿化带),事故车辆聚集在中间区域(黄色网格线附近),涉及至少2辆白色小型车并排停放,**占用了行驶方向的第2和第3车道,共2条车道**。\\n\\n\\n### 2. **交通事故类型** \\n事故车辆均为直立状态,无侧翻、碰撞变形等严重损坏迹象,且多车近距离聚集,推测为**轻微刮蹭或多车连环追尾**(无明显严重事故特征,可能为低速状态下的轻微接触)。\\n\\n\\n### 3. **人员情况** \\n在事故车辆(白色车)旁可见1名穿着亮色反光背心的人员,站立于事故车辆之间的车道内(未靠近道路边缘或应急车道),**处于中间车道区域,未完全靠边,存在被后方来车碰撞的安全风险**。\\n\\n\\n### 4. **警示标志放置情况** \\n图像中事故车辆后方(行驶方向的来车方向,即图像下方区域)未观察到三脚架或其他明显警示标志,**推测未放置警示装置**(可能因距离较近被其他车辆遮挡,但现有画面中无有效警示物显示)。\\n\\n\\n### 5. **交警抵达情况** \\n现场人员穿着反光背心(非普通车主常见着装),且在事故车辆旁进行处置,**推测该人员为交警或现场处置人员,交警已抵达现场**。\\n\\n\\n**总结**:现场为多车轻微刮蹭/追尾事故,占用2条中间车道,人员未靠边存在安全风险,未放置警示标志,交警已抵达处置。\"}" 39 } 40 ], 41 "images": [ 42 "/root/autodl-tmp/git/LLaMA-Factory/data/traffic_accident/dataset_no_negative/train/images/00.1_frame_000270.jpg" 43 ], 44 "objects": { 45 "ref": [ 46 "交通事故" 47 ], 48 "bbox": [ 49 [ 50 1044, 51 463, 52 1198, 53 723 54 ] 55 ] 56 } 57 } 58]
训练过程
注册训练集
在dataset_info.json中添加名为 traffic_accident 的训练集⬇️:
1"traffic_accident": { 2 "file_name": "traffic_accident_with_detail.json", 3 "formatting": "sharegpt", 4 "columns": { 5 "messages": "messages", 6 "images": "images", 7 "objects": "objects" 8 }, 9 "tags": { 10 "role_tag": "role", 11 "content_tag": "content", 12 "user_tag": "user", 13 "assistant_tag": "assistant" 14 } 15 }
添加训练配置
在 examples/train_lora 下新建一个yaml配置文件:qwen2_5vl_lora_traffic_accident.yaml,内容如下⬇️:
1### model 2model_name_or_path: /root/autodl-tmp/modelscope/models/Qwen/Qwen2___5-VL-32B-Instruct 3image_max_pixels: 2500000 4video_max_pixels: 16384 5trust_remote_code: true 6 7### method 8stage: sft 9do_train: true 10finetuning_type: lora 11lora_rank: 32 12lora_target: all 13lora_alpha: 32 14lora_dropout: 0.1 15 16### dataset 17dataset: traffic_accident # 这里数据集用上面dataset_info.json新增的数据集 18template: qwen2_vl 19cutoff_len: 20480 20max_samples: 14349 21overwrite_cache: true 22preprocessing_num_workers: 16 23dataloader_num_workers: 4 24val_size: 0.1 # 拿10%当验证集 25 26### output 27output_dir: saves/qwen2_5vl-32b-instruct-finetune/lora/traffic_accident_2 28logging_steps: 10 29save_steps: 100 30plot_loss: true 31overwrite_output_dir: true 32save_only_model: false 33report_to: tensorboard # pip install tensorboard 34 35### train 36per_device_train_batch_size: 1 37gradient_accumulation_steps: 16 38learning_rate: 1.0e-4 39num_train_epochs: 3.0 40lr_scheduler_type: cosine 41warmup_ratio: 0.1 42bf16: false 43fp16: true 44ddp_timeout: 180000000 45resume_from_checkpoint: null 46 47### eval 48per_device_eval_batch_size: 1 49eval_strategy: steps 50eval_steps: 50
开始训练
运行命令
1llamafactory-cli train examples/train_lora/qwen2_5vl_lora_traffic_accident.yaml
查看训练过程参数变化(tensorboard)
1tensorboard --logdir=saves/qwen2_5vl-32b-instruct-finetune/lora/traffic_accident_2
合并LORA模型
在examples/merge_lora中有可参考的合并LORA模型的配置文件。
训练完成后,创建一个新的配置文件 qwen2_5vl_lora_traffic_accident.yaml
1### model 原模型位置⬇️ 2model_name_or_path: /root/autodl-tmp/modelscope/models/Qwen/Qwen2___5-VL-32B-Instruct 3### 训练保存的LORA矩阵位置⬇️ 4adapter_name_or_path: /root/autodl-tmp/git/LLaMA-Factory/saves/qwen2_5vl-32b-instruct-finetune/lora/traffic_accident_2 5template: qwen2_vl 6finetuning_type: lora 7 8### export 合并LORA矩阵到模型中,设置导出模型路径 9export_dir: /root/autodl-tmp/git/textvqa_grounding_task_qwen2.5-vl-ft/model/traffic_accident_2 10export_size: 2 11export_device: cuda 12export_legacy_format: false
然后运行合并命令,将训练好的Lora低秩矩阵计算后合并到模型中,形成一个完整的独立模型。
1llamafactory-cli export examples/merge_lora/qwen2_5vl_lora_traffic_accident.yaml
部署模型服务
在 examples/inference 下新建一个推理配置文件 qwen2_5vl_32b_finetune.yaml (如果训练的模型参数是其他也可以修改配置文件名称)
1model_name_or_path: /root/autodl-tmp/git/textvqa_grounding_task_qwen2.5-vl-ft/model/traffic_accident_2 2template: qwen2_vl 3infer_backend: huggingface # choices: [huggingface, vllm, sglang] 4trust_remote_code: true 5 6# 图像处理参数 - 与训练时保持一致 7image_max_pixels: 2500000 8video_max_pixels: 16384
运行下述命令,启动 openai 格式的服务⬇️
1# 如果有3张卡,CUDA_VISIBLE_DEVICES=0,1,2 2API_PORT=8000 CUDA_VISIBLE_DEVICES=0 llamafactory-cli api examples/inference/qwen2_5vl_32b_finetune.yaml
启动后将会监听8000端口
MODELSCOPE_API_URL = "http://127.0.0.1:8000/v1"
MODELSCOPE_API_KEY = "0"
MODEL_NAME = "traffic_accident_2"
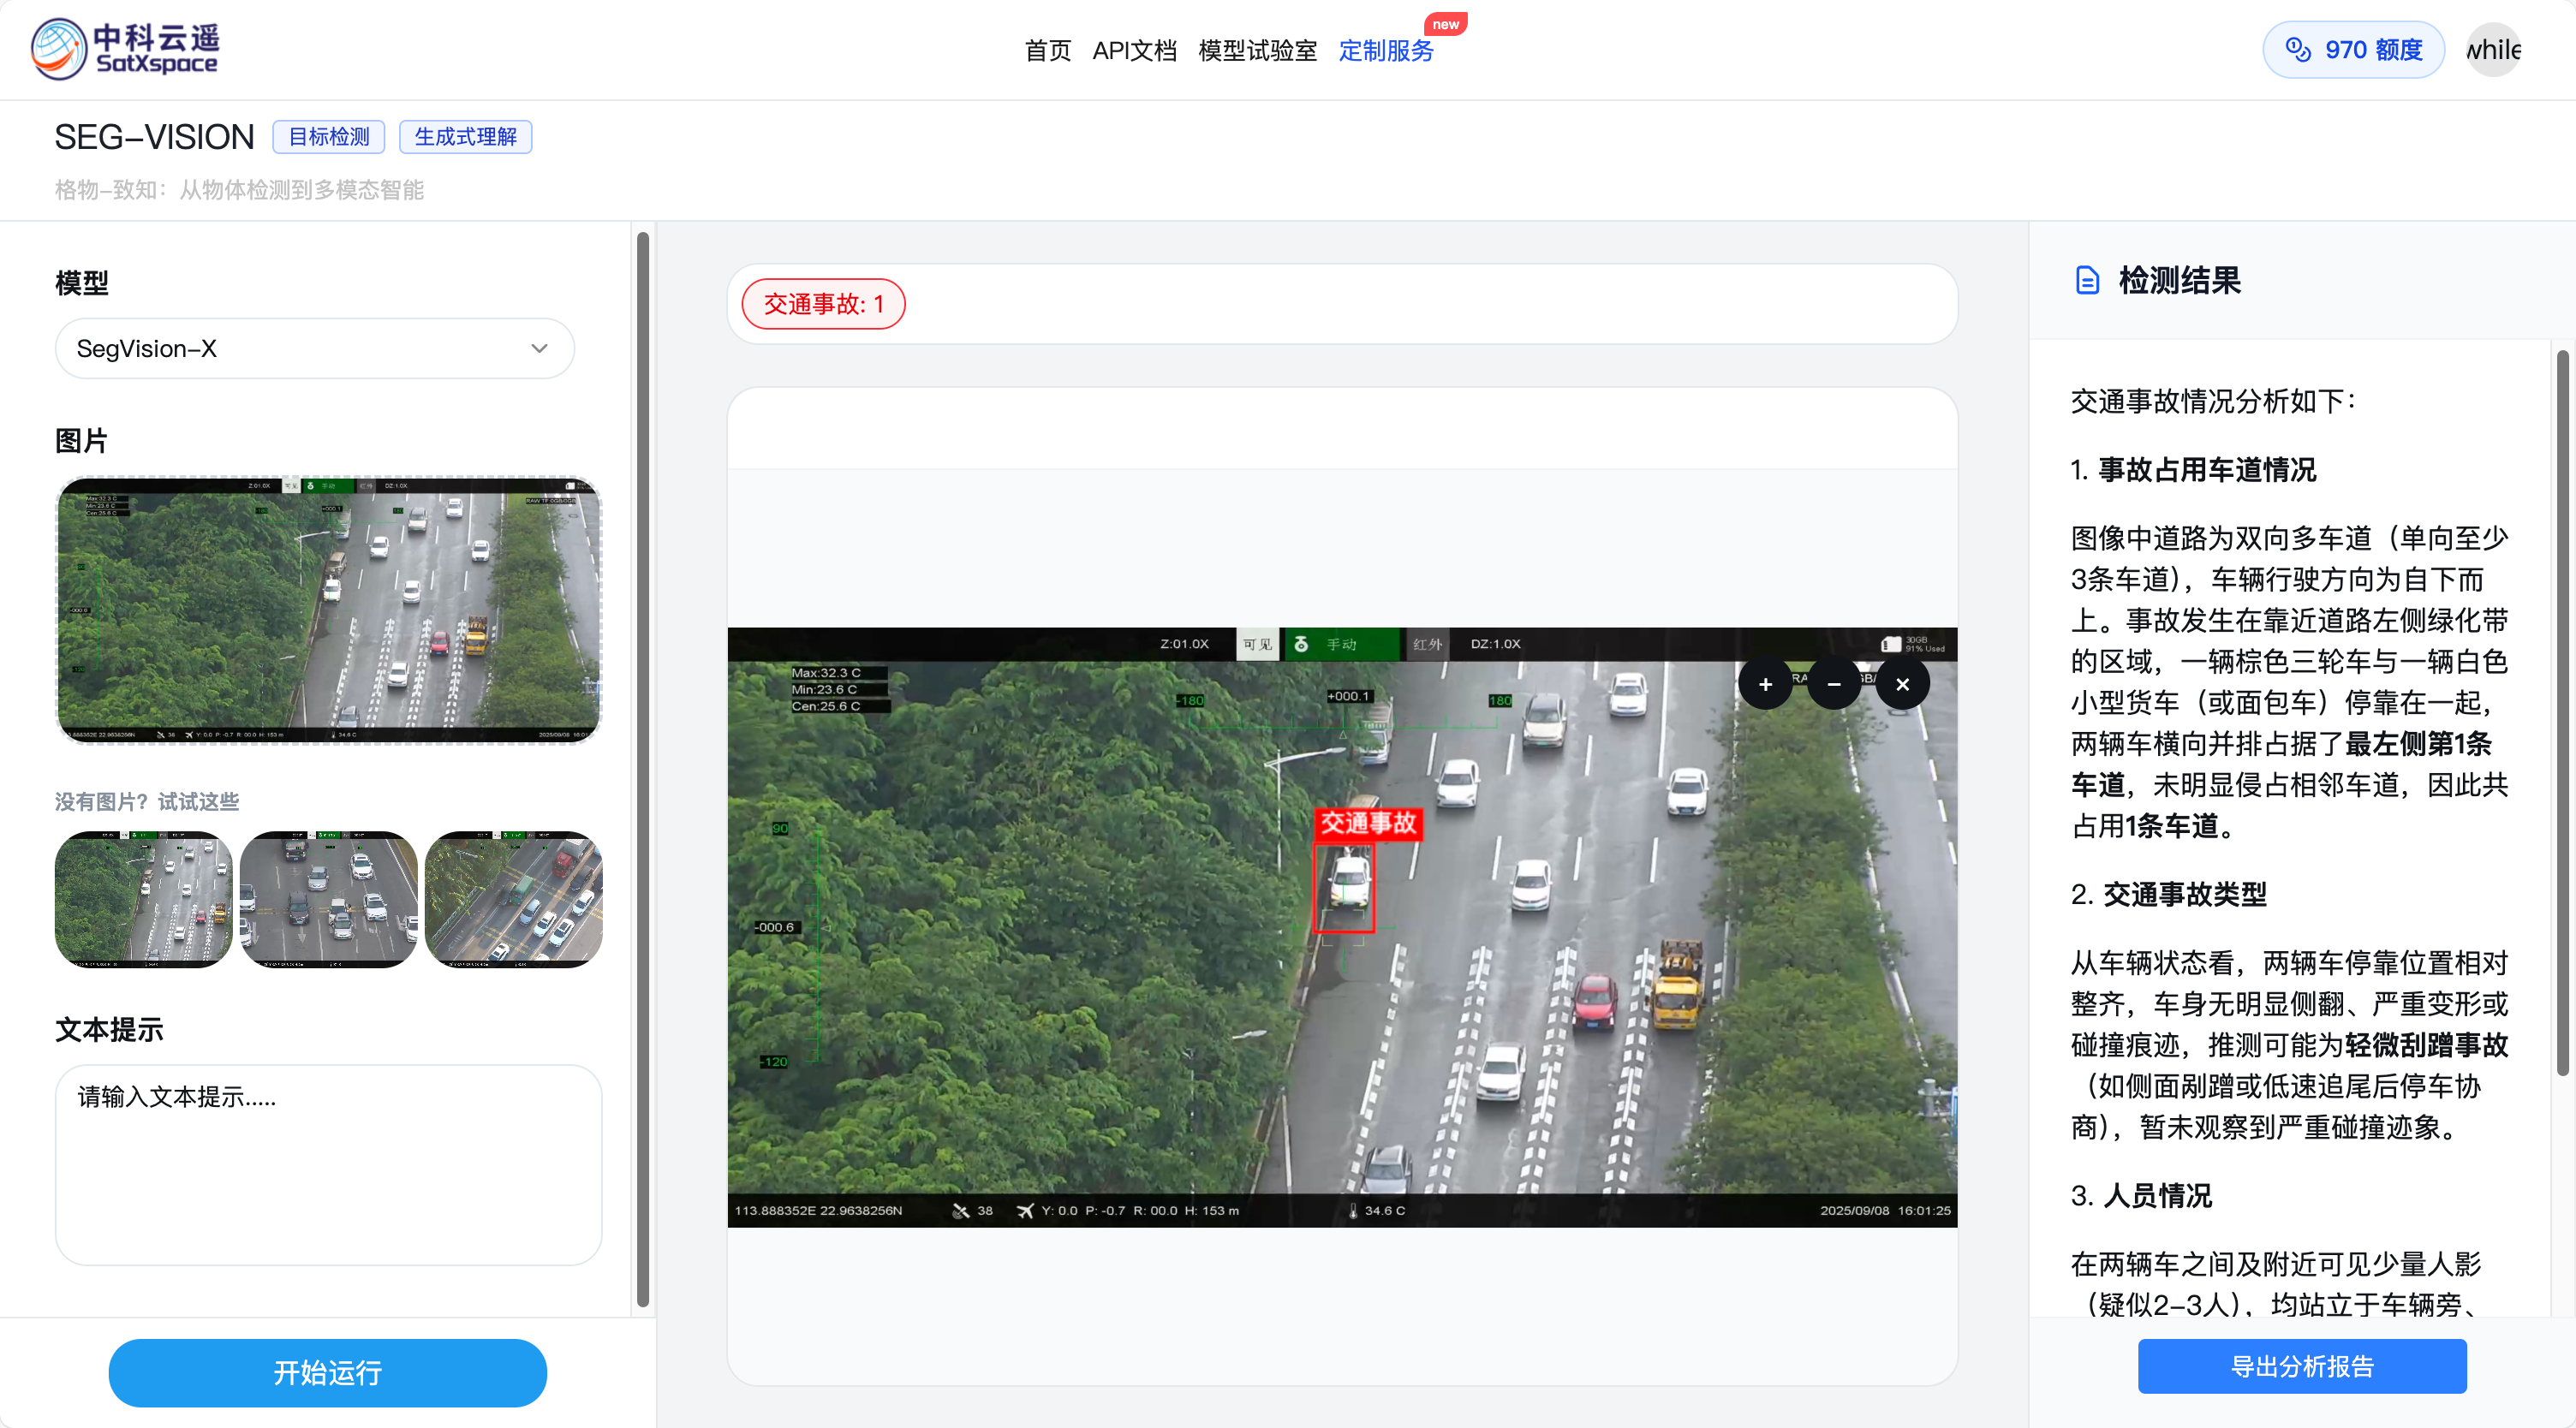
开发一个web看看
https://segvision.satxspace.org/